Most of the time people do love read. So as Photoshop provide the basic tricks for its own software, Adobe publish it book, photoshop CS classroom.
This book is really good for BEGINNER as it give you basic from handle the software keys and to the common trick of photoshop. This book referring to Adobe Photoshop CS, where you can learn it more faster from the advance version.
Ok, this tutorial might seem like to simple not to advance or not advance at all, but this is only for a BEGINNER!
This is an advance trick of text wording. At previous tutorial, we just manipulated the text design and pattern, which is using "fx" button. For this tutorial, we need to use some of shape in order to get this round words. (we will use the "ellipse tool" for this tutorial) .
As usual, run the adobe photoshop CS3 and hit File\New and select any size of workspace. Then go press and hold the "rectangle tool" button at the left of the workspace and select the "ellipse tool" as follow :

(make sure you set the color to black or dark color)
Start create the circle at the workspace. As the round appear, again go to the tool, and click "text" tool. This part is important! As you in the text tool mode, move the mouse point near the circle. There will appear different mouse point icon, and click there. Try follow this picture :
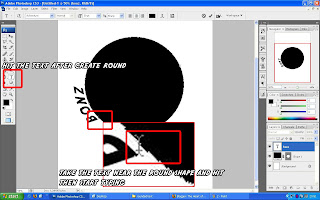
(click the image for clear view)
Well done! now you already know how to use the path selection tool as well as the text tool!
For Advance Round Word Tips and Tricks

(click the image for clear view)
and you now in text round mode! you can also adjust your font, font size and even apply "fx" effects!.
Next I'll show you how to adjust the position of the words (Some people want the word to be in the center) :
After you got your round words, you need to select the "path selection tool". After that, hit your text and adjust the text by click and hold the cursor to the point you desire, follow this picture below
For Advance Round Word Tips and Tricks
See this picture? The words are in the round. You can use the path selection tool to drag the words into the circle. You can also use opacity to control the circle shape to made it invisible, as below :
Try to be more creative! Dont limit your tricks just to the tutorial above, try to do something different and you might discover something!! Try to do this :
[Warning, this next post will be the very - very simple to those who are pro, this is very basic, so this tutorial only for BEGINNERS!]
One of the unique tools in the Photoshop, Text in this software seem to be very editable yet can be adjust with your desire.
Frequently asked by beginners : Text is boring, how to decorate those text?
(make sure you open new file, File\New and choose any of those.)
OK, in this tips and tricks, we will frequently use "FX" option to decorate this text. Firstly u need to select "text" tools from the left side of photoshop :
and start the text by dragging the box at the workspace and start typing any words. Mine set as below (any font, if you have attractive fonts, use it) with font style "juice" :
Ok next important trick is, hit the "fx" button at the bottom right of the workspace :
This "fx" button offer many effect such as "stroke","bevels", "drop shadow" and many more.. I show you how to use those one by one :
"fx" Stroke effect
This effect will added some "list" to your words, the default color for the stroke is red, you can adjust it by clicking the color bar and choose the color you like:
Well Done! you just complete this effect! Give a try for other effect (I suggest use the drop shadow effect)
Advance Tips and Trick For "FX"
Try to combine the effect for this words such as drop shadow and bevels. This is some result for the three effect "Fx" (stroke, drop shadow and bevel emboss)
(P/S: in drop shadow effect, increase the stat such as distance, spread and size to give more shadow looking. For bevel emboss, increase the "size" stat to give more crystal look)
Give a try and be creative!
Leave comment and question on this blog. Thank you for support.
|
One of the unique tools in the Photoshop, Text in this software seem to be very editable yet can be adjust with your desire.
Frequently asked by beginners : Text is boring, how to decorate those text?
(make sure you open new file, File\New and choose any of those.)
OK, in this tips and tricks, we will frequently use "FX" option to decorate this text. Firstly u need to select "text" tools from the left side of photoshop :
and start the text by dragging the box at the workspace and start typing any words. Mine set as below (any font, if you have attractive fonts, use it) with font style "juice" :
Ok next important trick is, hit the "fx" button at the bottom right of the workspace :
This "fx" button offer many effect such as "stroke","bevels", "drop shadow" and many more.. I show you how to use those one by one :
"fx" Stroke effect
This effect will added some "list" to your words, the default color for the stroke is red, you can adjust it by clicking the color bar and choose the color you like:
Well Done! you just complete this effect! Give a try for other effect (I suggest use the drop shadow effect)
Advance Tips and Trick For "FX"
Try to combine the effect for this words such as drop shadow and bevels. This is some result for the three effect "Fx" (stroke, drop shadow and bevel emboss)
(P/S: in drop shadow effect, increase the stat such as distance, spread and size to give more shadow looking. For bevel emboss, increase the "size" stat to give more crystal look)
Give a try and be creative!
Leave comment and question on this blog. Thank you for support.
[Warning, this next post will be the very - very simple to those who are pro, this is very basic, so this tutorial only for BEGINNERS!]
Brush is the best tool to decorate your photo, even if you use new workspace ( File\New) you can decorate and design your own art by using brush.
Commonly question by the beginners : Brush just round and nothing more to make any attractive design.
Actually, we need to download the brush and installed it to our adobe photoshop!
Ok here how it work :
First thing, you must get the new set of brushes by search at website ( I always use brush from "brushezzy") or you can download some of my brush at this download link button :
After the brushes download finish, open you C:\Program Files\Adobe\Adobe Photoshop CS3\Presets\Brushes
This "brushes" folder is the folder where you paste all the brush that you already download.
When this done, run Adobe Photoshop CS3 and click at "brush" tool at near left of the workspace. (make sure you already open the File\New)
Just follow this picture below :
And why don't you be more creative! Use all combination of brush and make some are more like this :
|
Brush is the best tool to decorate your photo, even if you use new workspace ( File\New) you can decorate and design your own art by using brush.
Commonly question by the beginners : Brush just round and nothing more to make any attractive design.
Actually, we need to download the brush and installed it to our adobe photoshop!
Ok here how it work :
First thing, you must get the new set of brushes by search at website ( I always use brush from "brushezzy") or you can download some of my brush at this download link button :
After the brushes download finish, open you C:\Program Files\Adobe\Adobe Photoshop CS3\Presets\Brushes
This "brushes" folder is the folder where you paste all the brush that you already download.
When this done, run Adobe Photoshop CS3 and click at "brush" tool at near left of the workspace. (make sure you already open the File\New)
Just follow this picture below :
(if you cant see those, please just click to enlarge it)
I bet you will get the new set of decorative brush. Start playing with the brush and use the creativity to make some new artwork!
To reset the brush, just right to workspace, again the small arrow button and hit reset. This will restore the brush back to normal.
This is some example of the brush that I always use :
To reset the brush, just right to workspace, again the small arrow button and hit reset. This will restore the brush back to normal.
This is some example of the brush that I always use :
And why don't you be more creative! Use all combination of brush and make some are more like this :
Ok, this tutorial might seem like to simple not to advance or not advance at all, but this is only for a BEGINNER!
History brush is the one of many basic tools that always use in photoshop involving colors, blur effect, and many more. The most effect use for this history brush is "pop up color" (there is many terms for this effect but I love to use pop up color)
This is one of example of pop up color effect :
 Look at Hayley William, yes! She is very cute. Ok, In this photo, Hayley William (the colored girl) is been applied to this pop up color (she is the only one who been colored). So how actually Photoshop can do this? Ok, come followed this Tips and Tricks!
Before you go more further to this tutorial, I suggest you download this photo and use it for the whole history brush tutorial.
Just click to this photo, view and right click, hit "save picture as" and save it.
First of all, you need to run Adobe Photoshop CS3, (previous version still ok but the icon may seem a bit different) and click to File/Open.
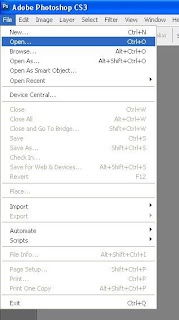
Then search the picture that you just download, and the workspace will appear like this :
Nice! After that, go to Image/Adjustments and hit black and white. The black and white option will appear at the screen. Do not made any adjustment to the photo, just click ok button.
Then this photo will turn to black and white mode, make sure you got this right, just like this picture below :
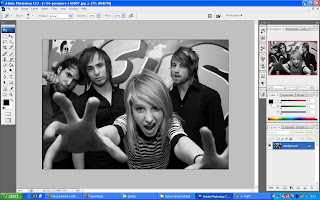
|
History brush is the one of many basic tools that always use in photoshop involving colors, blur effect, and many more. The most effect use for this history brush is "pop up color" (there is many terms for this effect but I love to use pop up color)
This is one of example of pop up color effect :
 Look at Hayley William, yes! She is very cute. Ok, In this photo, Hayley William (the colored girl) is been applied to this pop up color (she is the only one who been colored). So how actually Photoshop can do this? Ok, come followed this Tips and Tricks!
Before you go more further to this tutorial, I suggest you download this photo and use it for the whole history brush tutorial.
Just click to this photo, view and right click, hit "save picture as" and save it.
First of all, you need to run Adobe Photoshop CS3, (previous version still ok but the icon may seem a bit different) and click to File/Open.

Then search the picture that you just download, and the workspace will appear like this :
Nice! After that, go to Image/Adjustments and hit black and white. The black and white option will appear at the screen. Do not made any adjustment to the photo, just click ok button.
Then this photo will turn to black and white mode, make sure you got this right, just like this picture below :

Next step, we will use the the button at the upper right of adobe to set the history brush path, just follow this next picture :
Good! Then all you need to do is click the history brush at the tool, at the left :
Now you in history brush mode, where you can restore the original color of this photo at you desire spot! Give a shot, just follow this next picture :
Right click at the Hayley picture and set the brush to 300 pxl flow boundary, and adjust the brush size (Master Diameter) to 300 to 400 pxl (depend to your own size) just like this photo :
Ok, now you are ready to pop some color from the photo! just click the brush to Hayley's area and you will get this effect!!
So that's it! Pop up color effect!
For advance Tips and Trick for History Brush only...
This history brush doesn't limited to pop up color only, it also can be use for restoring photo from blur effect, tint effect and all other effects. If you wanna try blur effect pop up, try to apply : Filter\Blur\Gaussian Blur and set the blur to 3 to 5 mpxl. Then apply this history brush tutorial. For any questions, e-mail me at
bonzdesign@gmail.com.
Just an ordinary person who just want to show some big art. Also just a newbie for blog thing and just want to expand the art through this blog.
My name is Mohd. Faizall Ali. My close friend use to called me Bon, instead of Ejal of Zal. Born in Sibu Sarawak, Malaysia but grow n study at Kuching. Born on year 1990.
Im really interested in Adobe Photoshop and been use it since 2005, where the first time using this Photoshop, I bet it was adobe version CS2. Its really hard for the newbies to use this complex software, as it use not base with templet, we are the one how made the templet. I develop my own skill of photoshop with my friends, tutorial, from someone's design and most of all, my own creativity. Art need to be creative, as it made us unique.
I'm not really an expert to this Photoshop software, but as I learn this photoshop for about 4 years, I maybe have some experience to share with others that also want to know at least do some photo editing.
I also love to "borrow" some photos from my friends for editing with tihs photoshop. Making some simple effect and show them the result. I use to make a lot of friends through this photoshop. I also love to share my tutorial in how to made some of the effect on the photo to others, but it limited to my close friends only. So I hope this blog can expand my tutorial to my other friends as well as some other people that interest in photoshop.
Remember! I'm not the pro in this Photoshop. So I'm ready to be comment by the pro. This way we all can learn and improve.
Last but not least, please, followed this blog if you want to be update to the design, art, or the tutorial that I will post later. Thank you.
|
My name is Mohd. Faizall Ali. My close friend use to called me Bon, instead of Ejal of Zal. Born in Sibu Sarawak, Malaysia but grow n study at Kuching. Born on year 1990.
Im really interested in Adobe Photoshop and been use it since 2005, where the first time using this Photoshop, I bet it was adobe version CS2. Its really hard for the newbies to use this complex software, as it use not base with templet, we are the one how made the templet. I develop my own skill of photoshop with my friends, tutorial, from someone's design and most of all, my own creativity. Art need to be creative, as it made us unique.
I'm not really an expert to this Photoshop software, but as I learn this photoshop for about 4 years, I maybe have some experience to share with others that also want to know at least do some photo editing.
I also love to "borrow" some photos from my friends for editing with tihs photoshop. Making some simple effect and show them the result. I use to make a lot of friends through this photoshop. I also love to share my tutorial in how to made some of the effect on the photo to others, but it limited to my close friends only. So I hope this blog can expand my tutorial to my other friends as well as some other people that interest in photoshop.
Remember! I'm not the pro in this Photoshop. So I'm ready to be comment by the pro. This way we all can learn and improve.
Last but not least, please, followed this blog if you want to be update to the design, art, or the tutorial that I will post later. Thank you.
"Heart of Art" is a blog about artwork and design, that is discuss from the simple design to the advanced art. It also represent my gallery of my artwork, and also some simple and advance tutorial of "Adobe Photoshop", such as playing with layers, filters, and some famous tricks.
This blog is maybe been labeled as "just another new blog" but I guess with some talent and some old experience in artwork, especially working with adobe photoshop.
Most of the post will be more about photos, design and editing of some picture. So if there is someone interested in those three, welcome to this blog!
|
This blog is maybe been labeled as "just another new blog" but I guess with some talent and some old experience in artwork, especially working with adobe photoshop.
Most of the post will be more about photos, design and editing of some picture. So if there is someone interested in those three, welcome to this blog!


