History brush is the one of many basic tools that always use in photoshop involving colors, blur effect, and many more. The most effect use for this history brush is "pop up color" (there is many terms for this effect but I love to use pop up color)
This is one of example of pop up color effect :
 Look at Hayley William, yes! She is very cute. Ok, In this photo, Hayley William (the colored girl) is been applied to this pop up color (she is the only one who been colored). So how actually Photoshop can do this? Ok, come followed this Tips and Tricks!
Before you go more further to this tutorial, I suggest you download this photo and use it for the whole history brush tutorial.
Just click to this photo, view and right click, hit "save picture as" and save it.
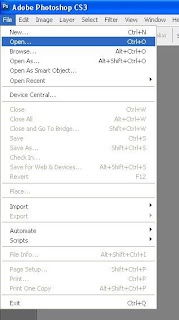
First of all, you need to run Adobe Photoshop CS3, (previous version still ok but the icon may seem a bit different) and click to File/Open.

Then search the picture that you just download, and the workspace will appear like this :
Nice! After that, go to Image/Adjustments and hit black and white. The black and white option will appear at the screen. Do not made any adjustment to the photo, just click ok button.
Then this photo will turn to black and white mode, make sure you got this right, just like this picture below :

Next step, we will use the the button at the upper right of adobe to set the history brush path, just follow this next picture :
Good! Then all you need to do is click the history brush at the tool, at the left :
Now you in history brush mode, where you can restore the original color of this photo at you desire spot! Give a shot, just follow this next picture :
Right click at the Hayley picture and set the brush to 300 pxl flow boundary, and adjust the brush size (Master Diameter) to 300 to 400 pxl (depend to your own size) just like this photo :
Ok, now you are ready to pop some color from the photo! just click the brush to Hayley's area and you will get this effect!!
So that's it! Pop up color effect!
For advance Tips and Trick for History Brush only...
This history brush doesn't limited to pop up color only, it also can be use for restoring photo from blur effect, tint effect and all other effects. If you wanna try blur effect pop up, try to apply : Filter\Blur\Gaussian Blur and set the blur to 3 to 5 mpxl. Then apply this history brush tutorial. For any questions, e-mail me at
bonzdesign@gmail.com.


http://bonzdesign.blogspot.com/2009/06/photoshop-tips-and-trick-power-of.html?showComment=1244473050733#c2695462821753888829'> June 8, 2009 at 7:57 AM
BonBon, i don't have photoshop CS3, can get from u x?
http://bonzdesign.blogspot.com/2009/06/photoshop-tips-and-trick-power-of.html?showComment=1244475606373#c4715098239531923952'> June 8, 2009 at 8:40 AM
owh lala...boleyh..tp gney?
http://bonzdesign.blogspot.com/2009/06/photoshop-tips-and-trick-power-of.html?showComment=1290760555188#c3954472004732201427'> November 26, 2010 at 12:35 AM
Hi,
I am an amateur in adobe software. I find this blog as one of the best lessons. I want to be one of the best Toronto website designers that's why I'm searching different techniques for adobe.
Thanks for sharing this informative post!
http://bonzdesign.blogspot.com/2009/06/photoshop-tips-and-trick-power-of.html?showComment=1309455604687#c6699466392221846682'> June 30, 2011 at 10:40 AM
Oooh… Sounds easy! This lesson is good for those who are new to editing pictures. If you want to be a graphic artist, practice with software such as Adobe CS3. Doing this can help enhance your skills. It's also good if you have a teacher who'll guide you.
Dolly Paolucci